Chainsaw Bar Maintenance
The guide bar on a chainsaw lives a tough life, as it is expected to be worn over time. A worn guide bar not only damages the efficiency of cutting, but also puts users at risk of cutting injury. Therefore, inspecting and maintaining your guide bar from time to time is of great importance, as a good guide bar delivers a safe and harmonious cutting life. If you are a home user and have put your chainsaw in service for a long time, it is necessary for you to learn how to diagnose and maintain your guide bar condition.
Inspection
There are two places where most guide bars wear: the edge of the bar rails and the surfaces inside them. Because the surfaces inside the rails are hard to check directly, you are supposed to focus on the top side of the bar rails.
Usually, the nose of the guide bar is the location where the rails show the most wear, so those who do a lot of limbing should pay more attention to the nose, as this area is burdened with most of the cutting.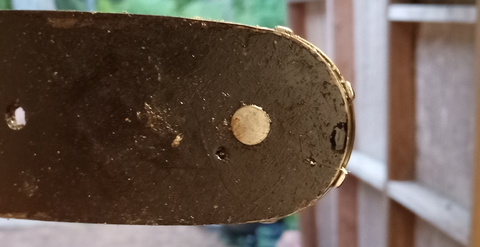
If you have noticed the area around the nose is worn, you can prepare the tools below to save your guide bar.
Tools
- A groove cleaner
- A flat file or a bar rail dresser
- A grease gun that fits the grease hole on your bar, which is typically situated on the nose. Those with no grease holes on the guide bar do not need to be greased.
Maintenance
First, you need to maintain the top and the bottom edge of the guide bar where birds of metal build up, and make the chain and the guide bar split down. You can check for burs with the flat file or the bar rail dresser by running it along the edge from one side to another, and keeping filing if necessary.
It is worth mentioning that an exclusive function for the bar rail dresser is that it can parallel the rail while the flat file does not. A parallel edge can lead in straight cutting which plays an important role in cutting results.
The second step is to clean the grease hole. It is often located in the nose and the heel of the guide bar, but for some special models, there is no grease hole on the body of the guide bars.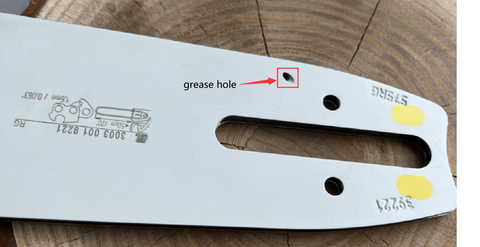
Additionally, after you have cleaned up the edge and the grease hole, you need to clean out the groove of the bar with the groove cleaner which looks like a small hook. You can stick it into the groove at the nose and pull it towards the heel, and then flip the guide bar over and repeat what you have done a moment before.
The last step is to lubricate the sprocket. Sticking the grease gun into the grease hole and squirt grease into the nose, then rotate the nose and continue to squirt grease again several times. So the old grease is removed and the new grease is filling in and taking its place.
Conclusion
If you have completed all the steps above, you can put your bar back into service and go back to work.
Please let us know if this works and if you have any suggestions or comments. Or you can join us to feature your passion for repair projects, share your stories with the Hipa family and also get help from Hipa.


