How To Clean The Carburetor In Stihl Chainsaw
If you are interested in chainsaw carburetor clean, you can go through this blog.
Preparation
1.At the beginning, you need to turn off the fuel valve and locate the fuel drain bolt on the bottom of your carburetor first.
2.Remove then drain bolt to drain the fuel from your carburetor and fuel line into a container and replace the drain bolt when finished.
3.Remove the carburetor.
Steps
Step 1: With the carburetor removed, you’d better start by clean the outside of the carburetor as best. You can use compressed air and carburetor cleaner if available to remove all gunk and grime from the outside. Lay down a towel or rack and be prepared to clean up any spilled fuel or debris as you disassemble the carburetor.
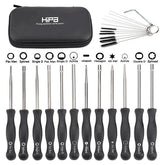
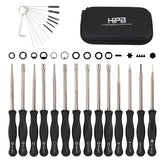
Step 2: You need to remove the float bowl from the bottom of your carburetor. There may be a solenoid mounted on the bottom. Remember to note the orientation of the solenoid wire and drain bolt for the reassemble of your unit. Remove the solenoid with the appropriate hardware for your unit. There will be a bolt at the bottom of the carburetor holding on the float bowl. Remove it with the appropriate socket or wrench and remove the float bowl if your unit does have a solenoid, this bolt needs to be cleaned by using a small wire carb cleaner and compressed air to clean any gunk out of every hole and the center passageway on this bolt. You can use a cotton swab and carb cleaner to clean the shut-off pin on the solenoid.
Step 3: Use carb cleaner and compressed air to deep clean your float bowl. Then, you need to scrape out any tough sediment or rust scrub with a brush by using a screwdriver or similar tool if necessary to make sure the bowl is as clean as you can do it.
Step 4: Locate the float pin and slide it out to remove the float. Spray carb cleaner onto a cotton swab and use this to remove any debris or build up inside the float needle seat. You can also use this to clean the rubber tip of the float needle. During the cleaning of the carburetor, if a significant amount of deposits is found inside the float chamber, it is often due to the failure of the gasoline filter. In this case, it is necessary to inspect the gasoline filter and, if confirmed as faulty, clean or replace it with a new one.
Step 5: For most units, the main jet is located insider the center post. Use a flat-head screwdriver carefully to loosen and remove it from the carburetor, and making sure not to strip the jet. Your main jet may be located on the side of the center post, you can use a flat-head screwdriver to remove it. If your main jet is on the side of the post and the main nozzle is fixed and can not be removed. For most units, the main nozzle should be removed. If it is stuck in place with some gunk, open up the choke and you will see the top of the nozzle. You can use a flat-head screwdriver and carefully pry it loose, it will fall out of the center.
Step 6: Take your main nozzle and use a thin strand of wire to clean out each hole on the nozzle followed by carburetor cleaner and compressed air. You need to make sure that each hole on the nozzle is completely clear including the main passage down the center. Repeat this process on your main jet.
Step 7: Locate the pilot jet which will either be beneath a screw or a capture plate on the side of your carburetor. Now pay attention to the choke side of your carburetor and locate the hole that leads to the pilot jet, spray through this passageway with carb cleaner to clean out your pilot jet. If you flip around the carburetor, you should see the carb spray coming out of a set of small holes in the venturi. Spray carb cleaner through the hole opposite this passageway as well.
Step 8: Loosen and remove the screw or capture plate and use a pair of needle nose pliers to fully remove the pilot jet. You can use a thin strand of wire carb cleaner and compressed air to clean out the jet passageway.
Then spray carb cleaner down the hole beneath where the pilot jet sits, this will clean out the passage that connects to the center post.
Step 9: Reassemble your carburetor.
Please let us know if this works and if you have any suggestions or comments. Or you can join us to feature your passion for repair projects, share your stories with the Hipa family, Hipa DIY community, and also get help from Hipa Store.


